Time of Flight Diffraction Technique (ToFD)
This type of ultrasonic testing technique is extensively employed for detection and characterisation of flaws during manufacturing and in-service inspection of critical engineering structures and systems.
Time of Flight Diffraction (ToFD)
 Any client who wants accurate sizing of the height of defects for their fitness for service calculations should be interested in considering ToFD.
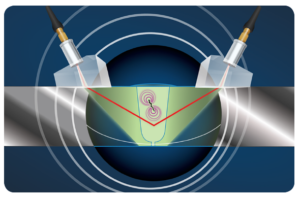
Ultrasonic testing techniques are extensively employed for detection and characterisation of flaws during manufacturing and in-service inspection of critical engineering structures and systems. These techniques assure the integrity and reliability of the components. One reliable and accurate technique is called the Time of Flight Diffraction Technique, or TOFD inspection. This method uses the ultrasonic diffraction.
Advantages of ToFD
- The use of ultrasonic diffraction has distinct advantages in the sizing of defects, particularly crack-like planar defects. During a ToFD inspection, diffracted waves effectively originate at the crack tips. The difference in time of flight of these waves carry the information on the spatial relationship of the crack tips and hence, the extent of the crack.
- ToFD is a single-pass operation, not amplitude-dependent and very accurate for sizing of vertical defects.
- The technique is found to be substantially more accurate in sizing the height of defects than conventional pulse-echo techniques, which are based on echo amplitude.
- The ToFD method is popular because of its high probability of detection, low false call rate, portability and most importantly, the intrinsic accuracy in flaw sizing, especially in depth.
- It provides a quick visual as to what the weld looks like through the cross-section scanned (similar to RT film) allowing a quick preliminary analysis of what the condition of the material/weld is. It is an easier visual representation to show a client than the Phased Array as it shows the data in one strip chart with everything visible.
- ToFD picks up all indications no matter the orientation and is also good for the detection of volumetric indications that Phased Array/Pulse Echo Ultrasonics may miss due to scattering/absorption of the ultrasonic signal.
- ToFD scanning can be done quickly and the data files do not take up much room.
- It does not add much complexity to Phased Array inspection but can increase the sizing accuracy.

Considerations When Using ToFD
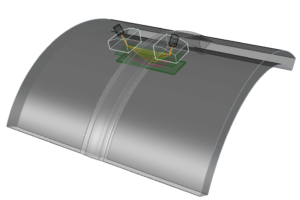
- The technique requires access to both sides from one surface. It requires a probe to run on both sides of the weld so occasionally access can be a constraint.
- ToFD requires in depth operator knowledge and specialized technology to effectively apply.
- It should be used in conjunction with another ultrasonic technique, either conventional Pulse Echo Ultrasound or Phased Array ultrasound. The complementary technique covers the ToFD dead zone at the top and bottom surface of the inspected piece. It also allows a quick reference to the axial location of any indications.
- It is difficult to use on pieces with thicknesses of 6mm or less, or on pipes with diameters of about 4 inches or less.
When and Where is ToFD Inspection Used?
- Almost exclusively used for inspection of welds
- Piping or plates
- Any application where detection and accurate height sizing of defects is important
- Any materials which are not too coarse-grained – for example, it is not suitable for austenitic stainless steels.
- Detection of pitting/corrosion/erosion in piping and plate material, however, this is only suitable for small areas as this requires individual line scans. It is a good confirmation tool for when AUT finds isolated patches or severe corrosion/erosion. AUT should still be used as a screener for large areas.
- Confirmation of indications and in situations where volumetric discontinuities may be a factor and RT is not an option
- Detection of fine cracking, pores and confirmation of cracking.
- Best monitoring tool for known in-service defects as it provides more accurate, repeatable inspection in terms of depth, height and length (lower order of accuracy than Pulse Echo techniques – in the tenths of a millimetre as opposed to millimetres)
| WHY ACUREN? |
|---|
|
Partner With Acuren for Your TOFD Inspection Needs
Our experts at Acuren are here to help you with all of your Time of Flight Diffraction inspection and service needs. If you are interested in our services, we encourage you to contact us online or call us at +1-800-218-7450.Partner With an Industry Leader Today
Our experienced service providers are ready to deliver innovative, reliable solutions tailored to enhance your efficiency, reduce risks, and optimize costs.
Contact Acuren
Additional Services
Advanced NDE/NDT
Acuren’s advanced NDT/NDE services, tooling and proprietary software solutions reduce the cost of inspections by using innovative technology.
Learn More →Radiographic Testing (RT)
Acuren’s breadth of radiography services ranges from portable units to large radiographic bays and our linear accelerator.
Learn More →Ultrasonic Testing (UT)
Acuren’s ultrasonic technicians use innovative technology to detect internal flaws and characterize materials.
Learn More →Success Stories
Tank Refurbishment Project Saves Client Over $100,000
Summary This large refining customer is a crude oil refinery located in North America. Acuren has been the primary NDT, inspection and materials engineering service provider to them since 2010,...
Learn More →Acuren’s High Temperature Phased Array Outperforms the Competition
Over the course of 2 years, Acuren’s high temperature phased array specialist team saved a Saudi Arabia client an estimated excess of $5,000,000 in costs that would have been incurred...
Learn More →Flare Stack - Extending Operating Life of Critical Legacy Asset
Integration across Acuren service lines achieves cost-effective and timely asset life extension This oil and gas customer had a 60-year-old flare stack with cracking and corrosion that was approaching its...
Learn More →